Tuesday 4 November 2014

Disable Copy and Paste for greater website security

One of the most popular questions I recieve here at Hypergurl is "How do you stop visitors from stealing your webpage information?"

Below is a little trick that will stop your visitors from copying and pasting your webpage information. Anyone with experience may know a way around this trick. However it will make it hard enough to discourage them and get them moving on to easier targets.

Add the following html code to your BODY tag: 

Here is how your BODY tag may look once implimented: 
<body ondragstart="return false" onselectstart="return false">

Complete Code: 

<html>
    <head>
        <title>Test</title>
    </head>
    <body ondragstart="return false" onselectstart="return false">
        <p>This is test text</p>
    </body>

</html>

Happy Coding !!

Tuesday 30 September 2014

SharePoint 2013 page title goes missing (disappears) when SSRS web-part is loaded

SharePoint 2013 page title goes missing (disappears) when SSRS web-part is loaded.I am showing dashboard made in SSRS on main page of sub-site (SSRS report called in web-part). But I faced a frustrating problem of page title getting disappeared as soon as page is fully loaded.

After long hours of trial and error & googgling I succeed with following steps 

1. Go to ‘Site Setting’ 
2. Navigate to ‘Master pages and page layouts’
3. In the library, search for the master page which your site has used in my 
    case it is 'seattle.master'.
4. Along with master page there will be HTML page with same name. select    
    ‘seattle.html’ page, go to ‘edit properties’ and uncheck ‘Associated File’ 
    checkbox.  
5. Then download the ‘seattle.master’ page and open it in any editor. You can 
    also open with SharePoint designer.
6. Remove all the new-line, space & tabs and make the page title in one single 
    line. 

7. Save the page and upload (or publish) if needed. 

And you are done!! 

Monday 28 July 2014

Checking memory (spaced) used, numbers of records in SQL Table

Problem: 
I was told in one of the project to give find the rate at which table is growing in terms of memory and number of records.


Solution: 
After bit research I found a stored procedure ‘sp_spaceused’. This procedure take table name as parameter and give you result of space and count used by tables. 


I stored this result in an table along with dates and executed query via job every week to track the increase. After 3 months i was able to answer the question that at what rate my fact tables is growing.

The best way to execute on all table is to use sp_msforeachtable stored procedure. 

sp_msforeachtable 'exec sp_spaceused [?]'

MSDN Reference Link: SP_SPACEUSED

Wednesday 9 July 2014

Hindi typing was never this easy on Android phone !

अब अपने अंदरीओड़ फोन पर आसानी से हिन्दी में टाइप करिए। 

Like typing in Hindi? Then there is good news for you. Google has come up with easy solution. Type Hindi in English and it will be converted to Hindi font.

Interesting huh!! Follow the below steps to claim you Hindi keyboard. 

STEP 01 : Download "Google Hindi Input" from play store 
              [प्ले स्टोर चालू करे और "Google Hindi Input" टाइप करे और डाउन लोड कर ले]  

 STEP 02: After installing go to settings, select 'Language & Input'
              [इन्स्टाल होने के बाद सेटटिंग में जाए और 'Language & Input' मेनू सिलैक्ट करे

STEP 03: Select 'Google Hindi Input'
             [वह पर 'Google Hindi Input' को सिलैक्ट करे।]

STEP 04: Come out of setting and open any application for typing. Select the input method as 'Hindi'. This menu can be find at different location on different phone. Mostly it appears at top as keyboard when keyboard is opened. 

[सेटटिंग से बाहर आए। मैसेज करने वाले किसी भी एप्लिकेशन को खोलिए। कीबोर्ड आयेगा। उपर आपको कीबोर्ड का नीसान नजर आयेगा। नेचे स्लाइड करके खोले और 'Hindi' सिलैक्ट करे]

STEP 05: You are done! you type in Hindi in English and it will be converted in Hindi font. Please note the Underline on 'a-अ' key.

[अब आप हिन्दी में लिखना सुरू कर सकते है। ध्यान दे की अगर आपके कीबोर्ड पर 'a-अ' बटन के नीचे रेखा है तो आप एनलिश में हिन्दी टाइप करे और आपका फोन उससे हिन्दी में अनुवाद कर देगा]

STEP 06: You can write in English with same keyboard by setting underline off on 'a-अ' key. 

[आप इसी कीबोर्ड से इंग्लिश भी लिख सकते है। ये करने ले लिए आप 'a-अ' बटन को दबाए और सुनिश्चित करे की 'a-अ' बटन के नीचे रेखा नहीं है]

STEP 07: If you want to see Hindi keyboard then you click on the globe and Hindi keyboard will appear. But it is very tough to type Hindi with Hindi keyboard :) 

[अगर आप हिन्दी में हे लिखना चाहते है तो 'दुनिया' के निशान वाले बटन को दबाये। पर यहा टाइप करना थोड़ा मुसकिल है :)]


Cheer!! Happy Hindi Typing!!
हिन्दी त्यपिंग के मजे लीजिये!!

Thanks!
Ravi Kumar V.


Friday 4 July 2014

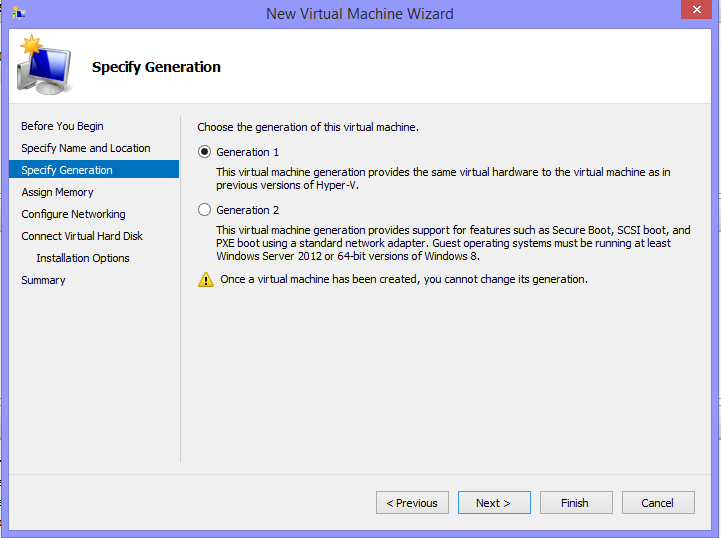
Hyper-V: Windows 7 does not reboot after installation


Have you ever scratched your head that after installation Windows 7 refuse to restart and black screen is displayed? It’s frustrating, isn’t it? I too banged my head for days after I find this solution. After following the below step Windows 7 rebooted. 

1. Install Windows 7 using ISO file or DVD whatever is suitable to you.
2. Select "Generation 1" of Hyper-V


3. On final reboot you will get final black screen.
4. Reboot the VM by restarting Hyper-V.
5. Message will come to “Press any key to boot from CD/DVD..” press am key to

    enter into installation.
6. On the below screen Press “Shift+F10” to open the command prompt


7. On the command prompt type the command 

      bootsect.exe /nt60 all /force 

8. Then type EXIT and reboot

Windows 7 rebooted! ENJOY !!

Changing System Administrator Account of Master Data Services (MDS)

When you restore the MDS database from some other computer, may be from different domain or from different computer where your username is not present, you will get error on web site as “Access Denied”. Or you will not see the “User and Group Permissions” link.

Reason for this is that since you have restored the MDS database from different domain or computer you username might not be present as administrator on MDS database. Solution is to change the administrator by following the below steps.

Execute the following command to change the administrator

EXEC [mdm].[udpSecuritySetAdministrator] @UserName='USERNAME', @SID = 'SID', @PromoteNonAdmin = 1

Steps to get SID

Open PowerShell command line and type the following command

$AdObj = New-Object System.Security.Principal.NTAccount("User or Group Name")
$AdObj.Translate([System.Security.Principal.SecurityIdentifier]).Value


After performing above steps you should be able to access the MDS web page as administrator.