Dynamic Language Translation In Power BI
Problem statememt
There was requirement to see the product name in different
languages as per region and country. But storing all the various language
translation in database was not an option. The only option left was to do the
language translation in Power BI on the fly. This document illustrates the
steps to achieve dynamic translation in Power BI.
Solution Overview
This problem statement was solved by using following
technologies
·
Azure Cogitative Services (Language Translation API)
·
Power BI Desktop Services
Following sections will explain the implementation in detail.
Azure coginative services
User should be register for “Azure Cogitative Services” to
use the translation APIs.
data files used for exmaple
There are 3 files used for this example,
PRODUCT.txt: This file contains names of the product.
LANGUAGE.txt: This file contains language name and
their code
PRODUCTSOLD.txt: this is sample file to test
Import these files in Power bi
Import these 3 files in the Power BI desktop.
cross join Product & language
The product and the language must be crossed join so that
each product can be represented in all the available languages. For this will
do little hack. Dummy column ‘CrossJoinHack’ with values as 1 was added in both
the tables.
Once this is done, established relationship between the 2
tables
And now the language table can be merged to Product table to
produce the cross join. This will bring the new column in the Product table.
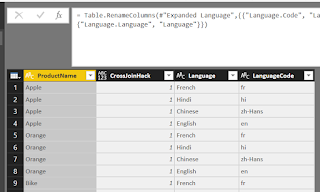
Now expand the column and cross join will be produced in
Product table. Rename ‘Language.Language’ to ‘Language’ & ‘Language.Code’
to ‘LanguageCode’
Important Step: calling congnitive service
To get each row of the product translated, cognitive
services needs to be called. This service will be called in the custom column
and 2 parameters ‘text’ & ‘to’ will be passed, where ‘text’ is text that
needs to be translated (product name in this example) and ‘to’ is language code
to which it needs to be translated.
Here is the code for the column. Click this link for API Reference.
Please replace the keys with your Cognitive Service key.
|
each Table.FromColumns({Lines.FromBinary(
Web.Contents("https://api.microsofttranslator.com/V2/Http.svc/Translate?text="
& [ProductName] & "&to="&[LanguageCode],
[Headers=[#"Ocp-Apim-Subscription-Key"="213e9cxxxxxxxxxxx63eaeef"]])
)})
|
In the below figure please note that query string is formed
by using ProductName and LanguageCode from the
available columns.
After the above step the Custom column has been added to the
Product table.
Next step is expanding the column, after expanding the XML
output us shown. Need to format the column as XML to get the actual
translation.
After these steps will get the translation for each product
for each language. Yeppeee!
creating role for testing
Next create roles for testing for each language
Next test for each role. First will test for Hindi.
Next for Chinese,
Hurry! Done!


