Wednesday, 21 October 2020

Reuse logic/code in Databricks Notebook

Databricks is great tool and it make processing of large amount of data very easy. While designing Databricks workflow, I came across the need to reuse the logic and business rules across many notebooks. I do not want to create jar or python wheel as it will create dependency on another tool. My team primarily being consist of data engineers from SQL and ETL background, I don’t not want them to learn new things and they were also least interested going out of Databricks Notebook. 

After research I came up with following solution to include the reusable logic from one notebook to another notebook.

%run ./pyclass

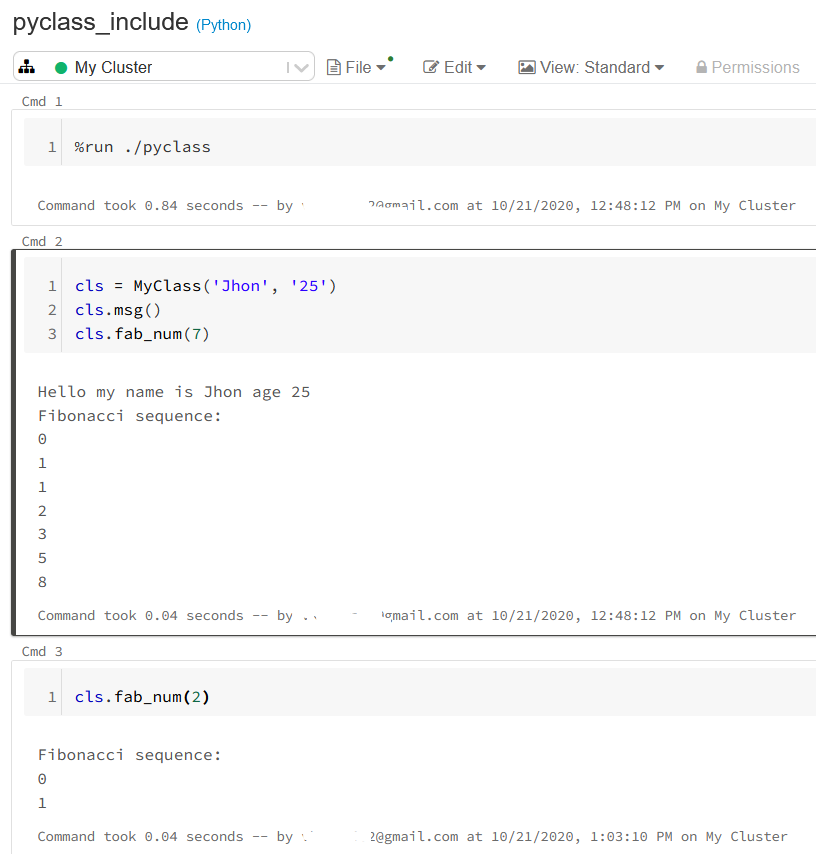
Let me explain you in detail. I have created one notebook with python class including all the reusable logic and included that class in another notebook using %run magic command. 
Once the class is included, I can simply create instance of the class and reuse it. In the example I created notebook name pyclass with class having two methods:

    1. msg: displays message
    2. fab_num : calculates Fibonacci numbers

Databricks-Include-Notebook-Class

In another notebook I created the instance of class and reused the logic. 

Databricks-Include-Notebook


Happy Coding!

Sunday, 4 October 2020

ADF Copy Activity to Oracle Error-"Error tolerance exceeded. Bulk load operation terminated"

Recently I have have been copying data from Azure Data Factory Copy activity to Oracle (on-premise) using Self-Hosted IR. After few days starting getting below error. 

{     
"errorCode": "BadRequest",     
"message": "Operation on target CD_SQL_ORA failed: Failure happened on 'Sink' side. ErrorCode=UserErrorOdbcOperationFailed,'Type=Microsoft.DataTransfer.Common.Shared.HybridDeliveryException,Message=ERROR [HY000] [Microsoft][ODBC Oracle Wire Protocol driver]Error tolerance exceeded. Bulk load operation terminated. 
Error in parameter 4.\r\nERROR [HY000] [Microsoft][ODBC Oracle Wire Protocol driver][Oracle]Invalid Position. Error in row 10001. Error in parameter 4.,Source=Microsoft.DataTransfer.ClientLibrary.Odbc.OdbcConnector,''Type=Microsoft.DataTransfer.ClientLibrary.Odbc.Exceptions.OdbcException,Message=ERROR [HY000] [Microsoft][ODBC Oracle Wire Protocol driver]Error tolerance exceeded. Bulk load operation terminated. Error in parameter 4.\r\nERROR [HY000] [Microsoft][ODBC Oracle Wire Protocol driver][Oracle]Invalid Position. Error in row 10001. Error in parameter 4.,Source=msora28.dll,'",     "failureType": "UserError",     "target": "PL_COPY_CUST",     "details": "" }

After googling about the error and even contacting Oracle DBA there was not solution found. Contacted Microsoft support as last option. After few trail and error it worked out after changing 'writeBatchSize' from 10,000 (default value) to 50,000. 

Again not sure of the reason and there is not much information around it in the documentation. Please let me know if anyone know exact cause of the issue.


Happy Coding!

Friday, 12 June 2020

Query to get resource class of user in Azure Synapse

I struggled a bit find to find which user is assigned to which resource class in Azure Synapse. After short effort I prepare this query to get the details. Thought it is worth sharing.

SELECT u.[name] as [User Name], p.[name] as [Resource Class] FROM sys.database_principals AS p
INNER JOIN sys.database_role_members AS r on p.principal_id = r.role_principal_id
INNER JOIN sys.sysusers AS u ON u.uid = r.member_principal_id
WHERE p.[name] like '%rc%' and u.[name] = 'user'

Happy Coding!!

Friday, 5 June 2020

AssertionError: col should be Column (Azure Databricks)

You get the error "AssertionError: col should be Column" when you try to add column to DataFrame.

df_col  = df_col.withColumn("UniqueID", hash(str(col)))

To solve this just import following and you should get rid of the error. Still did not found the cause but it worked. Will update as soon as cause is found.

from pyspark.sql.functions import *

Happy Coding!

Tuesday, 24 March 2020

Issue while connecting Azure Data Factory (v2) to Azure Data Lake Gen2 using Managed Service Identity (MSI)


Issue while connecting Azure Data Factory (v2) to Azure Data Lake Gen2 using Managed Service Identity (MSI)

Usually documentation of Microsoft is too good but for errors it does not offers much help. One is case when I was trying to connect to ADF v2 to ADLS Gen2 using Managed Identity. I was getting error 

“ADLS Gen2 operation failed for: Operation returned an invalid status code 'Forbidden'. Account: 'adlsgen2rk'. FileSystem: 'filesystem'. ErrorCode: 'AuthorizationPermissionMismatch'. Message: 'This request is not authorized to perform this operation using this permission.'. RequestId: 'd26ce7e5-601f-004f-4bda-017884000000'.. Operation returned an invalid status code 'Forbidden' Activity ID: f49c8379-d827-40d9-8c13-2206c8fd0c01.”


There was no help available online so connected with Microsoft to solve this.


Steps to solve are:
  1. Go to ADLS Gen2 where you want to connect
  2. On left navigation pan select "Access control (IAM)"
  3. Click on "+Add" button, select "Add role assignment"
  4. In form, in Role drop down select "Storage Blob Data Contributor"
  5. In Select, select your Azure Data Factory name and click "Save"
IMPORTANT: Wait for 5 to 10 minutes before it reflects in Azure Data Factory

Go to Azure Data Factory again and try creating Connection, it should be successful now 😊 !

Happy Coding!!

Monday, 20 May 2019

Run Linux distribution on Windows 10

Good News! Now you can run your favorite Linux distribution on Windows 10 as sub-system. And best part, these are available as download from Microsoft Store, just like any other application. 

Only down-part is that there is no GUI and only bash shell available for all the available Linux distribution. 

Steps to enable it are also simple;

Step-01: It is pre-requisite more than a step. Windows 10 build version should be 'Windows 10 Fall Creator Update or later' (Windows Build Version 1709).  For other version please follow the link.

Step-02: Run the below command to enable the Windows Sub-System. Run in PowerShell as Administartor

Enable-WindowsOptionalFeature -Online -FeatureName Microsoft-Windows-Subsystem-Linux


Step-03: Open 'Microsoft Store' and search for Linux, in the hint you will find 'Run Linux on Windows' to get all the available distributions of Linux


Step-03: Select the favorite Linux distribution and click on launch. It will take few minutes to install the Linux and then you can execute the bash shell by selecting the Linux distribution from the program menu


These distribution comes with Python installed on it :) !

Happy Linuxing!!!

Saturday, 13 January 2018

Dynamic Language Translation In Power BI

Dynamic Language Translation In Power BI

Problem statememt

There was requirement to see the product name in different languages as per region and country. But storing all the various language translation in database was not an option. The only option left was to do the language translation in Power BI on the fly. This document illustrates the steps to achieve dynamic translation in Power BI.

Solution Overview

This problem statement was solved by using following technologies
·       Azure Cogitative Services (Language Translation API)
·       Power BI Desktop Services
Following sections will explain the implementation in detail.

Azure coginative services    

User should be register for “Azure Cogitative Services” to use the translation APIs.

data files used for exmaple

There are 3 files used for this example,
PRODUCT.txt: This file contains names of the product.
LANGUAGE.txt: This file contains language name and their code
PRODUCTSOLD.txt: this is sample file to test

Import these files in Power bi

Import these 3 files in the Power BI desktop.

cross join Product & language

The product and the language must be crossed join so that each product can be represented in all the available languages. For this will do little hack. Dummy column ‘CrossJoinHack’ with values as 1 was added in both the tables.

Once this is done, established relationship between the 2 tables
And now the language table can be merged to Product table to produce the cross join. This will bring the new column in the Product table.
Now expand the column and cross join will be produced in Product table. Rename ‘Language.Language’ to ‘Language’ & ‘Language.Code’ to ‘LanguageCode’

Important Step: calling congnitive service

To get each row of the product translated, cognitive services needs to be called. This service will be called in the custom column and 2 parameters ‘text’ & ‘to’ will be passed, where ‘text’ is text that needs to be translated (product name in this example) and ‘to’ is language code to which it needs to be translated.
Here is the code for the column. Click this link for API Reference. Please replace the keys with your Cognitive Service key.
each Table.FromColumns({Lines.FromBinary(
Web.Contents("https://api.microsofttranslator.com/V2/Http.svc/Translate?text=" & [ProductName] & "&to="&[LanguageCode], [Headers=[#"Ocp-Apim-Subscription-Key"="213e9cxxxxxxxxxxx63eaeef"]])
)})
In the below figure please note that query string is formed by using ProductName and LanguageCode from the available columns.

After the above step the Custom column has been added to the Product table.
Next step is expanding the column, after expanding the XML output us shown. Need to format the column as XML to get the actual translation.

After these steps will get the translation for each product for each language. Yeppeee!

creating role for testing

Next create roles for testing for each language

Next test for each role. First will test for Hindi.

Next for Chinese,
Hurry! Done!

Sunday, 6 August 2017

Get-AzureRmSqlDatabase : ParentResourceNotFound: Can not perform requested operation on nested resource.

While executing "Get-AzureRmSqlDatabase" PowerShell command, you may get following error "Get-AzureRmSqlDatabase : ParentResourceNotFound: Can not perform requested operation on nested resource."

This error comes when you use full server name in command. For example, 
 Get-AzureRmSqlDatabase -ResourceGroupName "RDResourceGroup" -ServerName "rndsqlserver.database.windows.net"


Just remove the full server name and it should be fine. Example,
Get-AzureRmSqlDatabase -ResourceGroupName "RDResourceGroup" -ServerName "rndsqlserver"


Hope this helps!

Thursday, 4 May 2017

Pin SSRS 2016 components to Power BI dashboard

Here in this blog I will explain how to 'pin' SSRS 2016 components on Power BI desktop. 

Very first step is to configure Power BI account on 'Reporting Services Configuration Manager'. Navigate to 'Power BI Integration' tab at the end. Click 'Register With Power BI' button and signin with power bi account.

Once you have registered you can see the pin to Power BI icon on the toolbar


Next step is ensure that you 'SQL Server Agent' service is up & running. This will be required to refresh the SSRS component pinned to Power BI dashboard. 

Click on the 'Pin To Power BI' button on toolbar, login screen will be presented. After login is successful, the components on report which can be pinned will be highlighted. 


Select the item and option for selecting work space, dashboard, frequency of update will be presented. Select the appropriate options and click 'OK'. 


After you click 'Pin' the selected report item will be pinned to selected dashboard.


IMPORTANT: Please note that not all the component from reports can be pinned. The following report items can be pinned to a Power BI dashboard. You cannot pin items that are nested inside a data region. For example you cannot pin an item that is nested inside a Reporting Services table or list.
  • Charts
  • Gauge panels
  • Maps
  • Images
  • Items need to be in the report body. You cannot pin items that are in the page header or page footer.
  • You can pin individual items that are inside a top level rectangle but you cannot pin them all as a single group.


Sunday, 4 September 2016

WhatsApp tips & tricks on Andriod

WhatsApp just keeps on growing, adding new features and users all the time. The prospect of sending texts and making calls for free has tempted a whopping 800 million people onto the Facebook-owned app at last count.

If you're one of them, chances are there are a few elements of the app that still seem puzzling or annoying – here are few tips & tricks


Check when your WhatsApp message was read

You can tell when your message has been read in WhatsApp when the two ticks next to it in the chat window turn blue. Sometimes you may want to get a little extra detail.

Just tap and hold on the message and then tap the Info icon, and you'll get a precise time.


Send messages in bulk

You might want to save some time by sending out a bulk message, but that doesn't necessarily mean that you want all the recipients to know it's a group message.

The broadcast feature lets you send out the same message to multiple contacts, but it will appear as a private message between the two of you for them. In Android, tap Menu, and then ‘New Broadcast’.  


Get back deleted messages

WhatsApp backs up messages on your device every morning at 4AM. The easiest way to recover a recently deleted message is to uninstall the app and reinstall it.

During the process it will ask if you want to restore from backup. This will cover the last seven days. If you want to restore an older chat on Android, use an app like ES File Explorer and go to sdcard/WhatsApp/Databases to see your backups.

Rename the file you want to msgstore.db.crypt and then go to Settings > Apps > WhatsApp > Clear data, then start it up and restore when prompted.

Stop WhatsApp images from showing in your camera roll

You probably don't want all the images from WhatsApp to appear in your Camera Roll on iOS, or in your Gallery or Photos app on Android.

It's easy to sort on iOS, just go to Settings > Privacy > Photos and toggle WhatsApp off.

On Android, use a file manager like ES File Explorer, and go to sdcard/WhatsApp/Media,then tap New at the bottom left in any folder you don't want shared, and create a file called .nomedia. Your images won't pop up in the gallery anymore.


Lock the WhatsApp app

You have a wide choice of security apps that will enable you to password or PIN protect your WhatsApp chats.

Try Messenger and Chat Block, AppLock, or Smart AppLock. Some of these apps will even snap a photo if someone tries to access the app without the right PIN, so you can catch snoopers.

On Windows Phone you can try WhatsApp Locker.

Dynamic Text in Power BI Card Visuals


There are situation when you want to display dynamic text in Power BI based on the selection made on any of the visuals. This can be easily achieved using ‘Card’ visual and DAX statement. 


In the following sample I want to show the selected country in the Visual and if no country is selected it should show as ‘All Selected’.


Steps:

  1. Create a 'New Measure' by right clicking on needed fact or dimension on the right pan. I have create mesaure in DimSalesTerriorty. 
  2. Write this expression in the Measure

    Measure = "Country Name : " & IF(DISTINCTCOUNT(DimSalesTerritory[SalesTerritoryCountry]) > 1,"All Selected", FIRSTNONBLANK(DimSalesTerritory[SalesTerritoryCountry], ""))
  3. And you are done. Just select the 'Card' visual and select this newly created visual. 

Happy Coding!